Okay, maybe you're not. Maybe you just "have a friend" that is a book worm and you want to make them something meaningful and preferably custom as a gift. Look no further! "Your friend" will be so impressed when you take their favorite book and turn it into jewelry. Keep in mind that this tutorial, though it just shows how to make a custom bezel ring, can be used to make any jewelry from necklaces to charm bracelets, whatever your heart desires (and your local craft store carries supplies for).
STEP #1: GATHER SUPPLIES
You'll Need:
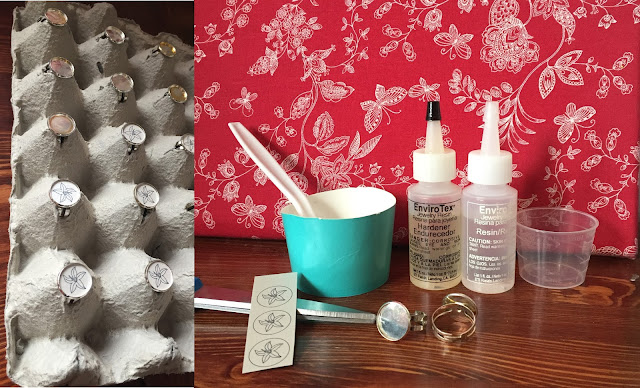
1. A Bezel Ring (or other jewelry with a bezel). I bought a 16 mm silver pack (20 adjustable rings for $10) from here because I wanted to make several rings. You can find a pack with a few at your local craft store.
2. Jewelry Resin (I found this one at Hobby Lobby and used my 40% coupon. It is from EnvironTex and you can also purchase it on Amazon here. I've also seen it at Jo-Ann Fabric, Michaels, and even Walmart)
3. Old Egg Carton
4. 2 Paper Cups
5. 2 Stirring Sticks (or plastic spoons)
STEP #2: CHOOSE AN IMAGE
You can cut from the page of a book - NO, I didn't say that! I meant you can photocopy a page. Really, anything will work. you could print off something from your printer onto scrapbooking paper or use a photo. The sky's the limit! Because I originally started this project to make custom rings for the book launch of my first book, Remembrandt (it is a spy series where every member of the secret spy organization wears a silver ring with the bittersweet nightshade engraved into the face of it), I printed off an image of the flower. If you notice from the photo, I picked a paper with a sheen that would mimic silver to make the ring appear as much like real silver as possible. Feel free to use any paper desired. Also, I found that I could print it from my inkjet printer and I didn't have any problem with the ink bleeding. Note: Thicker paper work a little better because thin paper can float a bit when you use the resin.
STEP #3: CUT TO THE SIZE OF THE BEZEL
If you happen to have a circle punch in the right size of your bezel, use it. Otherwise, you can draw or print a circle and cut it free hand like I did. Just make sure that it fits snugly into the bezel. You don't want the edge of the image visible.
STEP #4: INSERT IMAGE IN BEZEL AND PLACE RING IN EGG CARTON HOLDER
Because the resin is affected by gravity, you will want your rings level while drying. I found the cheapest and easiest solution is to use an old egg carton. Just cut little slits in the part that protrudes upward (I had to turn my carton upside down) and then put the rings inside. Then insert your image. I did about 20 rings at a time, but this works for just 1 too.
STEP #5: MIX YOUR RESIN
Every solution for resin is slightly different, but nearly all have two liquids that must be mixed together. One is the resin and one is the hardener. Make sure to read your instructions. Use a clean disposable cup (you won't be able to reuse it). Put in the resin first, then the hardener. My instructions said to use 1 part resin with 1 part hardener. Make sure you follow it EXACTLY! If you don't, the resin may not harden. After I mixed mine for a full 2 minutes, I poured it into a clean disposable cup and mixed with a clean stick (I actually just used the handle of a plastic spoon) for one more minute. This will ensure that all the resin is perfect.
STEP #5: DRIZZLE THE RESIN INTO THE BEZEL
Using your stirring stick, drizzle resin into the bezel until it completely covers the image. I continued to add resin until it domed above the bezel. Then adjust the ring in the egg carton so it is level with the ground.
STEP #6: REMOVE BUBBLES
This is the coolest part! You will notice that bubbles will form on top of the resin. Some will fade over time, but not all. To make sure your resin has a clear surface, you want to get rid of the bubbles. All you need is a straw. A straw, you say? YES! Place your straw about an inch or two away from the resin and blow gently. The warm air immediately pops all the bubbles!
STEP #7: WAIT
It takes about 20-25 minutes for the resin to begin to harden, which gives you time to remove bubbles and make sure the bezels are laying flat. Now all you have to do is wait! Let the resin set up. I usually wait overnight, but after a few hours you will notice that it has hardened. Once it has hardened, you're all set.
There are so many possibilities of different rings you can make. Be creative and have fun!
XoXo,


2 comments :
Excellent and very cool idea and the subject at the top of magnificence and I am happy to comment on this topic through which we address the idea of positive reaction and successful either on the subject as well and ask the subject of a successful.
Hair Building Fiber
Sandhi Sudha
Step Up Height Increaser
Growth on Powder
This is such a great resource that you are providing and you give it away for free. I love seeing blog that understand the value of providing a quality resource for free. https://www.pinterest.com/bikerringshop/skull-rings/
Post a Comment